How to Build a Rain Garden to Filter Run – Off (and keep your foundation dry!)
Create a rich plant basin to collect and filter rain-water runoff from gutters

Photo by David Hymel, Rain Dog Designs
During a downpour at a typical house in many municipalities, rain water gushes out of downspouts, across lawns treated with pesticides and fertilizers, into an oily street, and, finally, down a storm drain that dumps that pollution along with the water into a stream, river, or bay. By building a rain garden, you can divert your gutter water into an attractive planting bed that works like a sponge and natural filter to clean the water and let it percolate slowly into the surrounding soil. Installing a rain garden isn’t difficult if you’re willing to dig or you bring in machines to help. Ask your local Cooperative Extension Office for specifics about soil mix, garden size, and plants for your area. Then you’re ready to build.
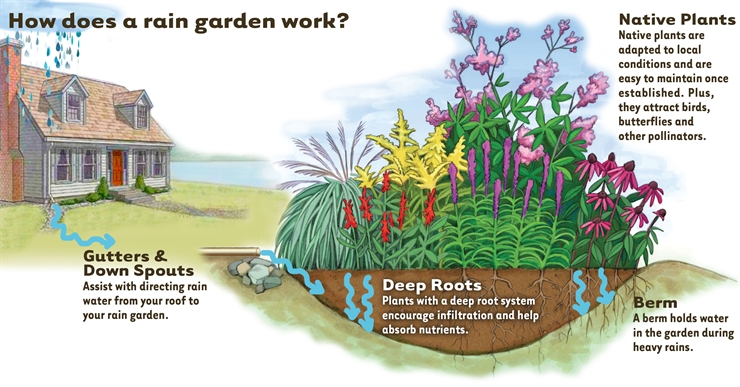
How to Create a Rain Garden Overview

Illustration by Washington State University Rain Garden Handbook for Western Washington Homeowners
The plants and amended soil in a rain garden work together to filter runoff. Generally, a rain garden is comprised of three zones that correspond to the tolerance plants have to standing water; the better a plant can handle “wet feet,” the closer it is placed to the center of the garden. Whenever possible, shop for native and drought-tolerant plants, keeping in mind that parts of a rain garden remain wet for long periods of time, while others are drier. Zone 1, the centermost ring of the rain garden, should be stocked with plants that like standing water for long periods of time, such as Lady fern (Athyrium filix-femina). The middle ring, Zone 2, should have plants that can tolerate occasional standing water, like Snowberries (Symphoricarpos albus). The outermost ring, Zone 3, is rarely wet for any length of time and is best planted with species that prefer drier climates, such as western bleeding heart (Dicentra formosa).
For more information on building a rain garden, visit the Washington State University’s Extension website.
Find A Site That Can Absorb Water

Photo by William Wright
Although a low-lying area might seem like a natural for a rain garden, you need a place that isn’t overly soggy already. Stay at least 10 feet from the house and at least 50 feet from a septic system or slopes greater than 15 percent. Call 811 to make sure underground utilities aren’t in the way. Once you have a tentative site, test the soil’s percolation rate. Dig a hole 2 feet deep and time how long it takes for 8 to 12 inches of water to disappear. For example, if 8 inches drains in 12 hours, the rate is 8 inches divided by 12 hours, or 0.67 inches per hour. A rate higher than 0.5 is great—your rain garden needs to be just 18 inches deep. If the rate is lower than 0.5 you’ll have to dig 30 inches deep. If the percolation rate is less than 0.1, the site isn’t suitable for a rain garden.
Determine the Size and Shape

Photo by William Wright
Your local extension office may have information to help you size a rain garden to suit rainfall patterns typical in your area. The ideal size might be smaller than you expect. On well-draining soil in rainy western Washington, where this project took place, a rain garden just one-tenth the size of a roof handles 99 percent of its gutter water. But if you’re short on space or puzzled about how to calculate the size, you can always put in a small rain garden and figure that the good it does will at least be better than what’s happening now. If you want an impressive-looking garden, make it at least 150 square feet. Ovals, kidneys, and teardrops often look best, but rain gardens can also be long and skinny. Use a garden hose to test possible shapes.
Once you settle on a design, decide where the water will flow in and where any overflow will exit. Mark the shape with spray paint. On your lawn, mark 18 inches farther out for sod removal, since grass has a way of creeping into planting beds. Also mark any other areas you want to excavate. The outline of this rain garden juts out at the bottom to show the perimeter of a dry well, an optional underground storage basin for excess water when the rain garden overflows.
Step Four // How to Build a Rain Garden to Filter Run-Off
Remove the Grass
Strip away any lawn by slicing off the roots with a sharp spade directed at as low an angle as you can manage, or use a sod cutter, which you can rent for about $80 a day. You should be able to roll up sections of the stripped lawn as if they were pieces of carpet.
Excavate the Basin
Using a shovel or an excavator, dig down to the depth you need. Create a flat bottom so that water will percolate down evenly. If the rain garden is on a slope, you can pile some of the excavated soil into a berm on the low side to retain the water. For stability, stomp the berm soil down well and make the base at least 2 feet wide and the top at least 1 foot wide. The peak of the berm should be at least 6 inches higher than the water level when the rain garden is full. Also excavate for a dry well, if included; the one for this rain garden is about 2 feet square and 3 feet deep.
Lay the Inlet Pipe

Photo by William Wright
Dig a trench for a pipe that will carry water from one or more gutter downspouts to the rain garden. (Note: If you can corral helpers, this can be done at the same time you excavate the rain garden.) Install the piping. Rigid piping with smooth walls is the most durable, but corrugated tubing is easier to work with; get the kind without perforations. Extend the piping into the rain garden basin by a foot or so. Line the area underneath with stones to prevent erosion. You can also place stones over and beside the pipe to hide it and to keep corrugated tubing from curling up. When all the piping is in place, fill in the rest of the trench with excavated soil.
Fill the Basin
Fill all but the top 6 to 12 inches of the excavated area with rain-garden soil. Slope the sides gently. If the soil you excavated is relatively free of clay, you can use a mixture of 65 percent native soil to 35 percent compost, or 2 scoops of soil for each scoop of compost. If you dug out clay soil, refill with a mixture of 60 percent screened sand and 40 percent compost. If you are creating a dry well, fill that with washed round stones 1½ to 2 inches in diameter. Also pack stones around the overflow area to prevent erosion.
Add Plants

Photo by William Wright
Group plants in zones, based on how well they tolerate having “wet feet” (see Overview). Plants that thrive in the wettest environment go in the center of the rain garden; that area tends to stay wet the longest after a storm. Put plants that can handle standing water on the sloping sides, and those that are suited to drier conditions on the edges.
Mulch Around the Plants

Photo by William Wright
Once the plants are in the ground, cover the inside of the rain garden with a 3-inch layer of mulch to keep the soil moist and to prevent weed seeds from sprouting. Until a rain garden’s plants are established, even drought-tolerant plants require supplemental watering to survive dry seasons. Check the mulch depth annually and replenish as necessary. Rain gardens don’t require fertilizers beyond the compost used in the soil mix. Weed and prune to keep the rain garden looking its best.